• Skip to primary navigation
  • Skip to main content
  • Skip to primary sidebar
Yarndrasil logo
  • Tutorials
  • Patterns
  • Vintage
  • Subscribe
  • About Me
  • Beginner Crochet Tutorials
  • Contact Me
menu icon
go to homepage
  • Tutorials
  • Patterns
  • Vintage
  • Subscribe
  • About Me
  • Beginner Crochet Tutorials
  • Contact Me
    • Instagram
    • Pinterest
    • YouTube
  • subscribe
    search icon
    Homepage link
    • Tutorials
    • Patterns
    • Vintage
    • Subscribe
    • About Me
    • Beginner Crochet Tutorials
    • Contact Me
    • Instagram
    • Pinterest
    • YouTube
  • ×

    Home » Kid's Crochet Patterns » Wild Child Crown

    Wild Child Crown

    Published: February 21, 2019 · Modified: Apr 1, 2022 by Elissa Jenkins · This post may contain affiliate links · This blog generates income via ads

    Sharing is caring!

    681 shares
    • Email
    • Facebook
    Wild Child Crown for Preschoolers

    "Where the Wild Things Are" is one of my favorite children's books. Everything about it is amazing: the illustrations, the message, the story, and its timelessness. It's one of those that has been carried down through the generations.

    I've read it to my daughter so much that when she's too full of love she bites my arm! Ouch! and also, opps because now I've got to make sure she stops that before sending her off to school. 

    In any case, I really wanted to make her a crown inspired by the book. When I found the "Go Faux Fur" yarn by Lion Brand I was so excited because "Mink" is the perfect color for the base of the crown. 

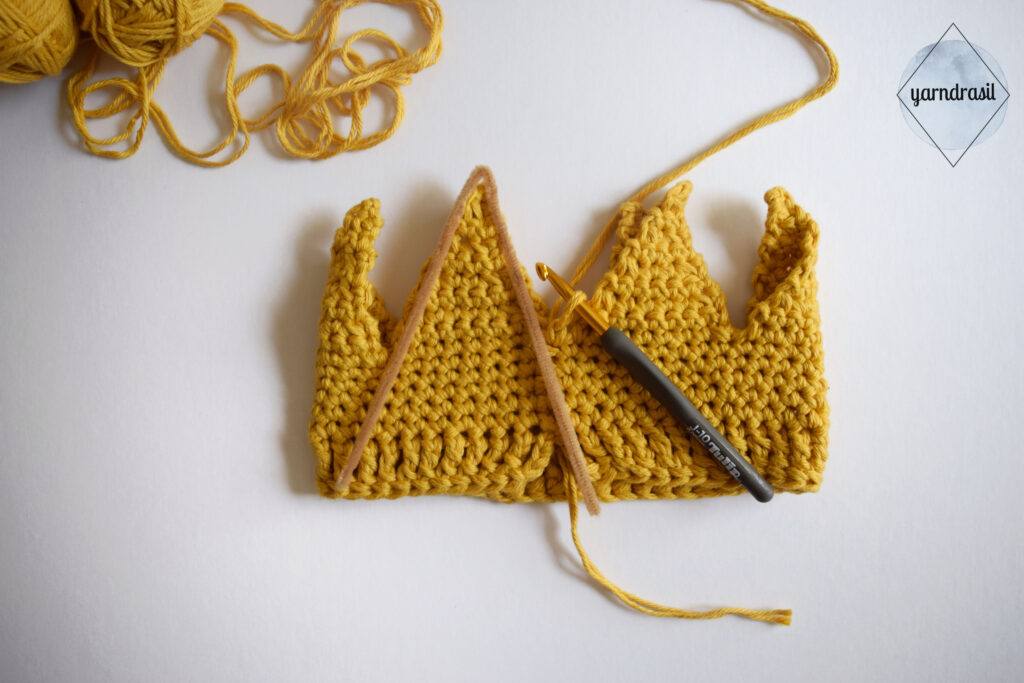
    This pattern uses some unconventional techniques (crocheting over pipe cleaners) to make sure that the tall points of the crown stay upright. 

    Difficulty:

    Intermediate

    Terms:

    U.S. terms

    Supplies:

    • Lion Brand, Go Faux Fur - Mink, 1 skein
    • Knit Picks, Comfy Worsted Cotton (109 yard, 50 gr) - Semolina, 2 skeins 
    • Hook — U.S. J/10 (6.0mm)
    • Yarn needle

    Optional:

    • Pipe Cleaners in a light tan, light yellow or golden color (6 pipe cleaners total)
      • Note: I used light tan because it’s what my local craft store had in stock. Just make sure the color of the pipe cleaner is lighter than the color of the yarn so that it blends better
    • Needle-nose pliers

    Abbreviations:

    • yo - yarn over
    • ftr - foundation treble crochet
    • ch - chain
    • sc - single crochet
    • sc2tog - single crochet two together (a.k.a. decrease)
    • fpdc - front post double crochet

    Foundation treble — Foundation stitches are fantastic for most garments and hats because they create a stretch that can’t be achieved by beginning with a row of chains. If you’ve never done this stitch before I recommend venturing over to YouTube. It is very easy. The general idea is that you make an extra chain before beginning the stitch. If you just need a refresher or are amazing at following written directions here they are:

    • 1 ST: Ch 5, yo two times, insert your hook into the 5th st from the hook, yo, pull through st, ch 1, yo, pull hook through two loops, yo, pull hook through two loops, yo pull hook through final two loops
    • ALL FOLLOWING STS: *yo two times, insert hook into ch st, yo, pull through, ch 1, pull hook through two loops, yo, pull hook through two loops, yo pull hook through final two loops repeat * until desire number of sts is achieved (making sure to count the beginning ch 5 as a st)

    Gauge:

    4”x4” — 13 sts and 15 rows

    Size:

    Ages 2 - 5 years old (18.5” - 19.5” head diameter)

    The finished circumference is 18"

    Crown laying flat

    Notes:

    Yarn —This piece is completed using two strands of yarn together. The point of this is to create a bulkier and stiffer cotton yarn that is less likely to lose its shape. Working with two strands at once is most easily achieved by pulling the yarn from the center of the skeins and holding both ends evenly together. 

    Points — There are a total of six points on this crown. The first point is made without breaking the yarn after completing rows 1-7. The remaining five points are worked one at a time. I decided to work over one pipe cleaner, per one point, when completing the final row of the crown points. This step is not necessary if you find it intimidating. However, it’s much easier than it looks and leaves the points of the crown standing straight up without using starch. 

    Pattern:

    Headband portion of crown

    Row 1: Work 48 ftr, sl st with top of 1st stitch (ch 5), ch 1 (48 sts)

    Note: Make sure not to twist your work. Connecting the yarn in this way will leave an open notch directly underneath where the sl st connects the piece. This will help us when attaching the fur later on.

    The notch along the first row will allow us to more easily attach the faux fur

    Rows 2 - 7: Sc into same st as join, sc in each stitch around, sl st to join, ch 1 (48 sts)

    Points of crown

    1st Point

    Row 8: Sc into same st as join, sc in next 7 sts, ch 1, turn (8 sts)
     
    Row 9: 1 sc in each st across, ch 1, turn (8 sts)
     
    Row 10: Sc2tog, sc in next 4, sc2tog, ch 1, turn (6 sts)
     
    Row 11: 1 sc in each st across, ch 1, turn (6 sts)
     
    Row 12: Sc2tog, sc in next 2 sts, sc2tog, ch 1, turn (4 sts)
     
    Row 13: 1 sc in each st across, ch 1, turn
     
    Row 14: sc2tog, sc in next st, sc2tog, ch 1, turn (2 sts)
     
    Row 15: 1 sc in each st, ch 1, turn (2 sts)
     
    Row 16: Sc2tog (1 st)
     
    Row 17: Ch 2, sl st in same st, fasten off 
    Working the points of the crown

    Points 2 - 6

    Row 1: Attach yarn in the next unworked sc of base, ch 1, sc in same st that you attached the yarn, sc in each of the next 7 sts, ch 1, turn (8 sts)
     
    Row 2: 1 sc in each st across, ch 1, turn (8 sts)
     
    Row 3: Sc2tog, sc in next 4 sts, sc2tog, ch 1, turn (6 sts)
     
    Row 4: 1 sc in each st across, ch 1, turn (6 sts)
     
    Row 5: Sc2tog, sc in next 2 sts, sc2tog, ch 1, turn (4 sts)
     
    Row 6: 1 sc in each st across, ch 1, turn (4 sts)
     
    Row 7: Sc2tog, sc2tog, ch 1, turn (2 sts)
     
    Row 8: 1 sc in each st across, ch 1, turn (2 sts)
     
    Row 9: Sc2tog (1 st)
     
    Row 10: Ch 2, sl st in same st, fasten off

    Pipe Cleaners

    Working over your pipe cleaner

    1. Find the seam of the piece and attach the yarn in the top of the seam
    2. Sc in same st space
    3. Fold and position the pipe cleaner to line up the point, leaving about a half inch of slack at either end of the point, point the tail of the pipe cleaner towards the inside of the piece. Moving foward, work over your pipe cleaner.
    4. Sc 8 sts up towards the tip of the point 
    5. Work 2 sc at into the top st of the point
    6. Work 8 sc down towards the base of the crown
    7. Let go of pipe cleaner
    8. Sl st in next st
    9. Repeat steps 3-8 five more times, sl st to join
    Showing how to lie the pipe cleaner against the yarn
    Sorry for the coloring! It started raining and this post is from the pre-studio light era ⛈️

    Trimming excess pipe cleaner

    Firmly and as close to the base as possible, twist adjoining ends of the pipe cleaner together, trim excess to ¼”, use needle nose pliers to fold pointed tip away from the inside of the crown, repeat with pipe cleaner end. To finish, use your pliers to firmly pinch the points where the pipe cleaners meet. Be sure to feel the inside of the crown. If any rough points remain, just keep pinching until the inner brim is nice and smooth inside. 

    Pinching the ends of the pipe cleaners closed

    Attaching fur

    Row 1: Hold piece with the base of the crown facing up, attach fur yarn to 1st sp between tr sts, loosely sc in each space around, sl st to join and close the notch


    Row 2: Work fpsc in each st around, sl st to join, fasten off

    Attaching the faux fur to the crown

    More Kid's Crochet Patterns

    • Crochet Kids Scarf
    • Crescent Moon Pillow for Nursery
      Amigurumi Crescent Moon
    • Trick-or-Treating Basket
    • Racerback Toddler Dress

    Reader Interactions

    Comments

    1. Dana says

      May 06, 2019 at 3:20 am

      Hi, I love your pattern but need to make it for a one year old. Do you have any easy suggestions about how to decrease the width of the hat? Thanks much, any suggestions you have are appreciated

      Reply
      • Elissa Jenkins says

        May 07, 2019 at 3:30 pm

        Hi Dana,

        Thank you so much! This hat is right on the edge of being able to work for a one year old. Its circumference is 18”. Depending on how big the kiddo’s head is, it may work as is.

        If you’d rather not risk it, one solution could be to work about 4 (evenly spaced) decreases in “Row 1” of “Attaching Fur”. 

That’d look something like:

        “Row 1: Hold piece with the base of the crown facing up, attach fur yarn to 1st sp between tr sts, 1 sc in same sp, 1 sc in next 9 sts, sc2tog, *1 sc in next 10 sts, sc2tog, repeat * 2 times, sl st to join (44 sts)”

        And then you’d work “Row 2” as normal.

        I think those decreases would tighten it just enough without warping the shape. I’d also recommend hot gluing little circles of yellow felt over the pipe cleaners just to make sure the ends are completely covered and the baby isn’t able to pick at them at all.

        I haven’t tested this myself, so if you do give it a try I’d love to hear if it worked for you! I hope this helps 🙂

        Reply

    Leave a Reply Cancel reply

    Your email address will not be published. Required fields are marked *

    Primary Sidebar

    Hi, I'm Elissa! A craftswoman, crocheter, and mama. I’m excited to be able to share my love of creating, textiles, and crocheting with you.

    🧶More about me →

    Knit Picks Ad with Blue, Purple and Pink Yarn

    Popular Patterns and Tutorials

    • Magic Circle Crochet Technique
      Magic Circle Tutorial for Crochet
    • Swatch Out
    • Racerback Toddler Dress
    • Single Crochet Tutorial
      Single crochet (sc)

    Footer

    ↑ back to top

    Privacy & Cookie Policy | Terms & Conditions | Sign Up! for emails and updates | Contact me

    Yarndrasil Copyright © 2019-2023 on the Seasoned Pro Theme

    We use cookies on our website to give you the most relevant experience by remembering your preferences and repeat visits. By clicking “Accept All”, you consent to the use of ALL the cookies. However, you may visit "Cookie Settings" to provide a controlled consent.
    Cookie SettingsAccept All
    Manage consent

    Privacy Overview

    This website uses cookies to improve your experience while you navigate through the website. Out of these, the cookies that are categorized as necessary are stored on your browser as they are essential for the working of basic functionalities of the website. We also use third-party cookies that help us analyze and understand how you use this website. These cookies will be stored in your browser only with your consent. You also have the option to opt-out of these cookies. But opting out of some of these cookies may affect your browsing experience.
    Necessary
    Always Enabled
    Necessary cookies are absolutely essential for the website to function properly. These cookies ensure basic functionalities and security features of the website, anonymously.
    CookieDurationDescription
    cookielawinfo-checkbox-analytics11 monthsThis cookie is set by GDPR Cookie Consent plugin. The cookie is used to store the user consent for the cookies in the category "Analytics".
    cookielawinfo-checkbox-functional11 monthsThe cookie is set by GDPR cookie consent to record the user consent for the cookies in the category "Functional".
    cookielawinfo-checkbox-necessary11 monthsThis cookie is set by GDPR Cookie Consent plugin. The cookies is used to store the user consent for the cookies in the category "Necessary".
    cookielawinfo-checkbox-others11 monthsThis cookie is set by GDPR Cookie Consent plugin. The cookie is used to store the user consent for the cookies in the category "Other.
    cookielawinfo-checkbox-performance11 monthsThis cookie is set by GDPR Cookie Consent plugin. The cookie is used to store the user consent for the cookies in the category "Performance".
    viewed_cookie_policy11 monthsThe cookie is set by the GDPR Cookie Consent plugin and is used to store whether or not user has consented to the use of cookies. It does not store any personal data.
    Functional
    Functional cookies help to perform certain functionalities like sharing the content of the website on social media platforms, collect feedbacks, and other third-party features.
    Performance
    Performance cookies are used to understand and analyze the key performance indexes of the website which helps in delivering a better user experience for the visitors.
    Analytics
    Analytical cookies are used to understand how visitors interact with the website. These cookies help provide information on metrics the number of visitors, bounce rate, traffic source, etc.
    Advertisement
    Advertisement cookies are used to provide visitors with relevant ads and marketing campaigns. These cookies track visitors across websites and collect information to provide customized ads.
    Others
    Other uncategorized cookies are those that are being analyzed and have not been classified into a category as yet.
    SAVE & ACCEPT
    Powered by CookieYes Logo