

Are you wondering how to crochet a flat circle? In this post we take a detailed look at how to do just that. Whether you're just starting out, or are having issues, we'll go over everything you need to know. Down below you'll find a video tutorial, a written pattern and photo references.

Projects You Can Make with a Flat Circle
Coasters, hats, bags, amigurumi toys, face scrubbies, appliqués, oh my! The number of projects that begin with a flat circle seems endless. It goes without saying that this is a must-know technique! But how do you crochet a flat circle without it curling or making ruffles? Let's take a look.
Terms:
All of my patterns and tutorials use U.S. terms.
The Process and Formula
The basic principle (or formula) of this technique does not change across stitches. You begin by creating a ring, working a set number of stitches into that ring, and then evenly spacing your increases with each subsequent round. Laid out that looks like:
- Create a ring using the magic circle technique or by starting with a chain
- Round 1: Work up the required number of stitches for the stitch that you are using (see chart below)
- Round 2: Increase into every stitch by working two stitches into every stitch space
- Round 3: Work one stitch and then increase, repeat around
- Round 4: Work two stitches and then increase, repeat around
- Round 5: Work three stitches and then increase, repeat around
- Round 6: Work four stitches and then increase, repeat around
- For each subsequent round: Carry on working one additional stitch before the increase, repeat around
Notice that I don't say how to end the round. That's because you can use either the spiral technique or slip stitch to join. It depends on what you're making. We'll go over that in a moment.
Down below we'll look at an example using half double crochet (hdc). But first, let's go over what does change across the possible stitches.
How Many Stitches to Start With Depends on the Stitch You're Using
You're here because you're trying to learn how to crochet a flat circle. That means that you are most likely a beginner. The very last thing I want to do is enrage you with a gauge and math lesson. So, I'm not going to.
What you need to know is that the stitch you're using (ex: single crochet, half double crochet, double crochet, etc.) for your project changes the number of starting stitches in round one.

When your flat circle curls or creates ruffles, it's because you need to adjust the number of starting stitches in round one.
If you're using a pattern, the designer will have done the hard work for you! But let's say you're following a pattern and are still having trouble. That means that you need to adjust your gauge because it is not matching up with what the designer has laid out for you. Check your pattern and work up a gauge swatch to see what's going on. The easiest fixing for this would be going up or down a hook size.
When you're free styling, erm, I mean designing your own pattern there will be some need for experimentation on your part. We'll talk more about why in a moment.
Now maybe you're not a beginner and you're trying to understand the math behind this. Maybe you just love to nerd out on math! If that's the case, check out this brilliant post by Dora Does. She delves deep into how to use Pi, and gauge, to calculate the number of starting stitches that you need for your project.
Chart for the Average Number of Starting Stitches
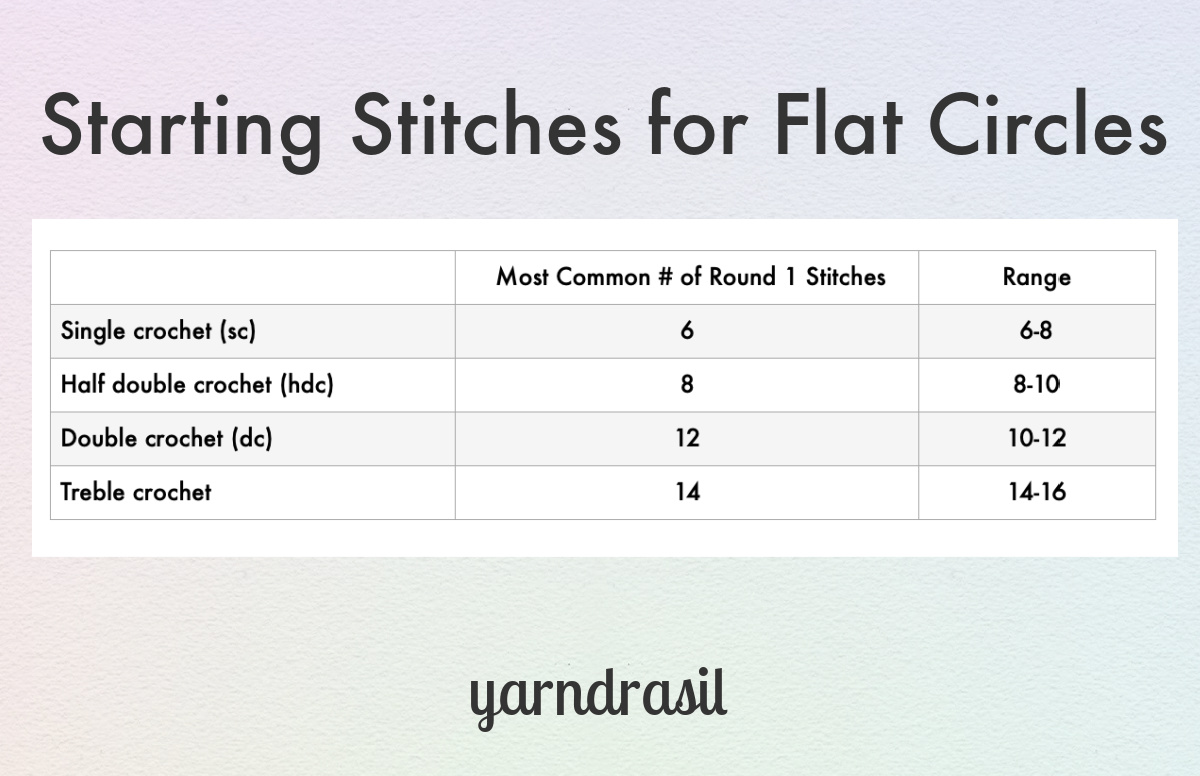
Why This May Vary
The above chart is an estimate. What yarn and hook you're using, mixed your personal tension style will affect the number of starting stitches that you need. Some people crochet their stitches very tight. Some people crochet loosely. That's why it's very important to ensure that your gauge matches what your pattern (or the yarn label) is calling for.
Spiral Method or Slip Stitch to Join?
Now that we've gone over the process of crocheting a flat circle, I want to touch briefly on how to end the rounds. The technique that you use depends on what you're making. And ultimately, what you choose is a matter of preferences. The spiral method will work up, without a seam, in a way that looks like an ammonite. And the slip stitch to join method, will look like a complete circle but will have a seam.

Spiral Method
You're probably wondering why you'd ever need to use this method. I admit that it's not very common. But if you're making a project that is three dimensional you should use this method! The benefit of this method is that there is no visible seam! Rather than slip stitching, we mark the end of our rounds using a stitch marker. This serves as a visual reminder of where the round begins. I always put my stitch marker in after completing the first stitch of the round. If you get in the habit of this, you'll be less likely to lose your place. Some examples of projects that can be worked in this fashion include: hats, amigurumi projects, baskets, etc..
To even things out near the end, I normally slip stitch across a couple stitches which helps hide the fact that it isn't exactly even. Again, this is just a personal preference. I tend to be less bothered by the couple slip stitches when compared to a seam throughout the entire project.
Slip Stitch to Join
If you're making something that is going to stay a flat circle, you should use this method. Some examples include: a coaster, a face scrubby or a round bag. When using this technique, you slip stitch in the first stitch of the round and then work a chain to achieve the height of the next round.
Half Double Crochet Example:
Finally, let's look at an example pattern using half double crochet!
Abbreviations:
- MC - magic circle
- Ch - chain
- Sl st - slip stitch
- St(s) - stitch(es)
- Hdc - half double crochet
- Inc - work two half double crochet in one st space
Note:
Reoccurring chain 2 does not count as a stitch.

How to Crochet a Circle
In this example we look at how to crochet a flat circle using the half double crochet stitch. Please read the rest of the blog post first if you are interested in using a different stitch.
Materials
- Any yarn
- Note: novelty yarn, such as eyelash yarn or scrubby yarn, will make this process more difficult as it is a challenge to see the stitch definition.
Tools
- Corresponding hook (see yarn label)
Instructions
- Mc, ch 1 (Alternative: Ch 4, sl st in first st to join, ch 2)
- Work pattern:
Round 1: 8 hdc in ring, sl st in first st to join, ch 2 (8 sts)
Rounds 2: Inc in each st around, sl st in first st to join, chain 2 (16 sts)
Round 3: *1 hdc, inc, repeat * around, sl st to join, chain 2 (24 sts)
Rounds 4: *1 hdc in each of the next two sts, inc, repeat * around, sl st to join, chain 2 (32 sts)
Round 5: *1 hdc in each of the next three sts, inc, repeat * around, sl st to join, chain 2 (40 sts)
Round 6: *1 hdc in each of the next four sts, inc, repeat * around, sl st to join, chain 2 (48 sts)
Round 7: *1 hdc in each of the next five sts, inc, repeat * around, sl st to join, chain 2 (56 sts)
Round 8: *1 hdc in each of the next six sts, inc, repeat * around, sl st to join, chain 2 (64 sts)
Subsequent Rounds: Carry on working one additional hdc before the inc for each new round, until the circle measures the desired diameter
Notes
The time listed is an estimate. Actual results vary.


Leave a Reply